How to Create an Automated Task Using windows Task Scheduler
In this article, we'll explore How to Create an Automated Task Using windows Task Scheduler.
Windows 10 offers a powerful built-in tool called Task Scheduler that allows you to automate tasks, run programs, and execute scripts at specific times or events. you can create a task in at least two different ways using the basic and advanced settings. we will be creating task using advanced settings, basic method is just minified way of advanced setting.
Create an advanced task on Task Scheduler
Step 1: Opening Task Scheduler
To open Task Scheduler, follow these steps:
- Press the "Windows" key on your keyboard or click on the Windows logo in the bottom-left corner.
- Type "Task Scheduler" in the search bar and click on the "Task Scheduler" app in the search results.
Step 2: Right-click the "Task Scheduler Library" branch and select the New Folder option.
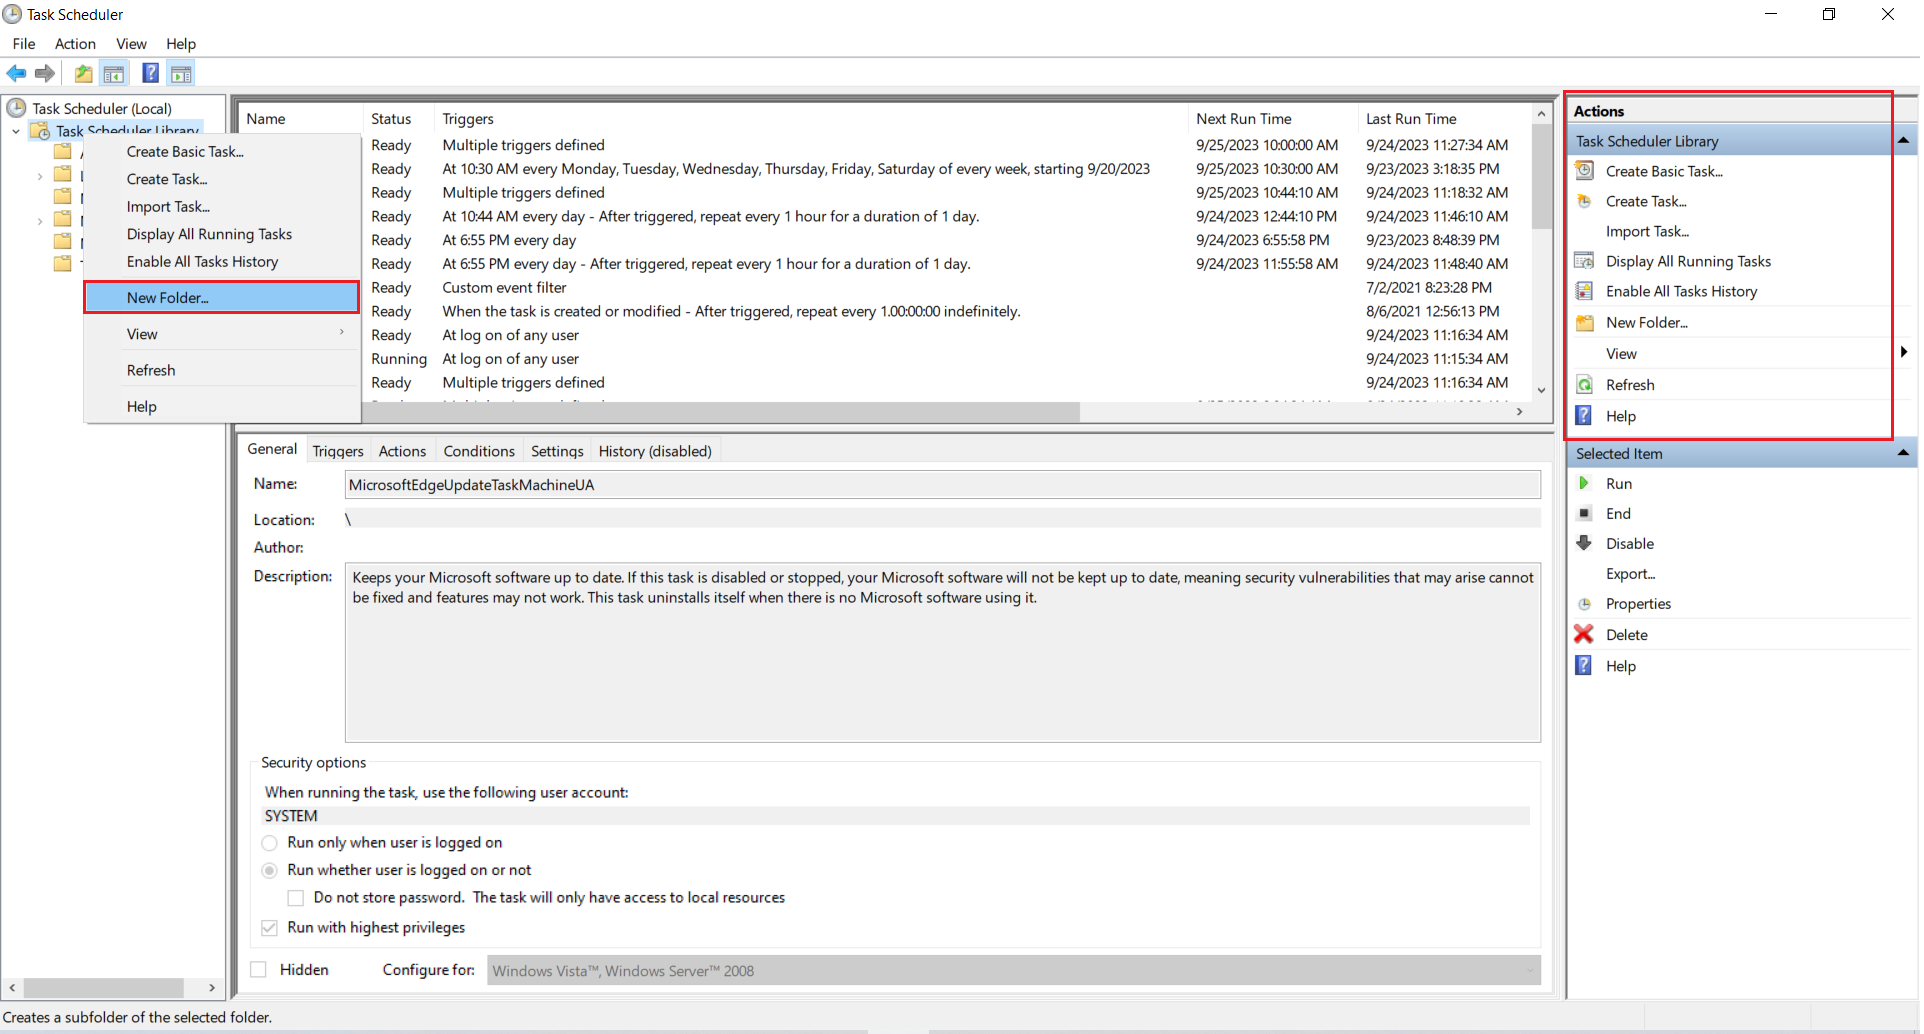
Step 3: Type a name for the folder – for example, MyTasks. (This step isn't a requirement, but it's a recommended step to keep your tasks separate from the system and apps tasks.)
Step 4: Click the OK button And Expand the "Task Scheduler Library" branch, and select the MyTasks folder.
Step 5: In the Action menu And Select the "Create Task" option.
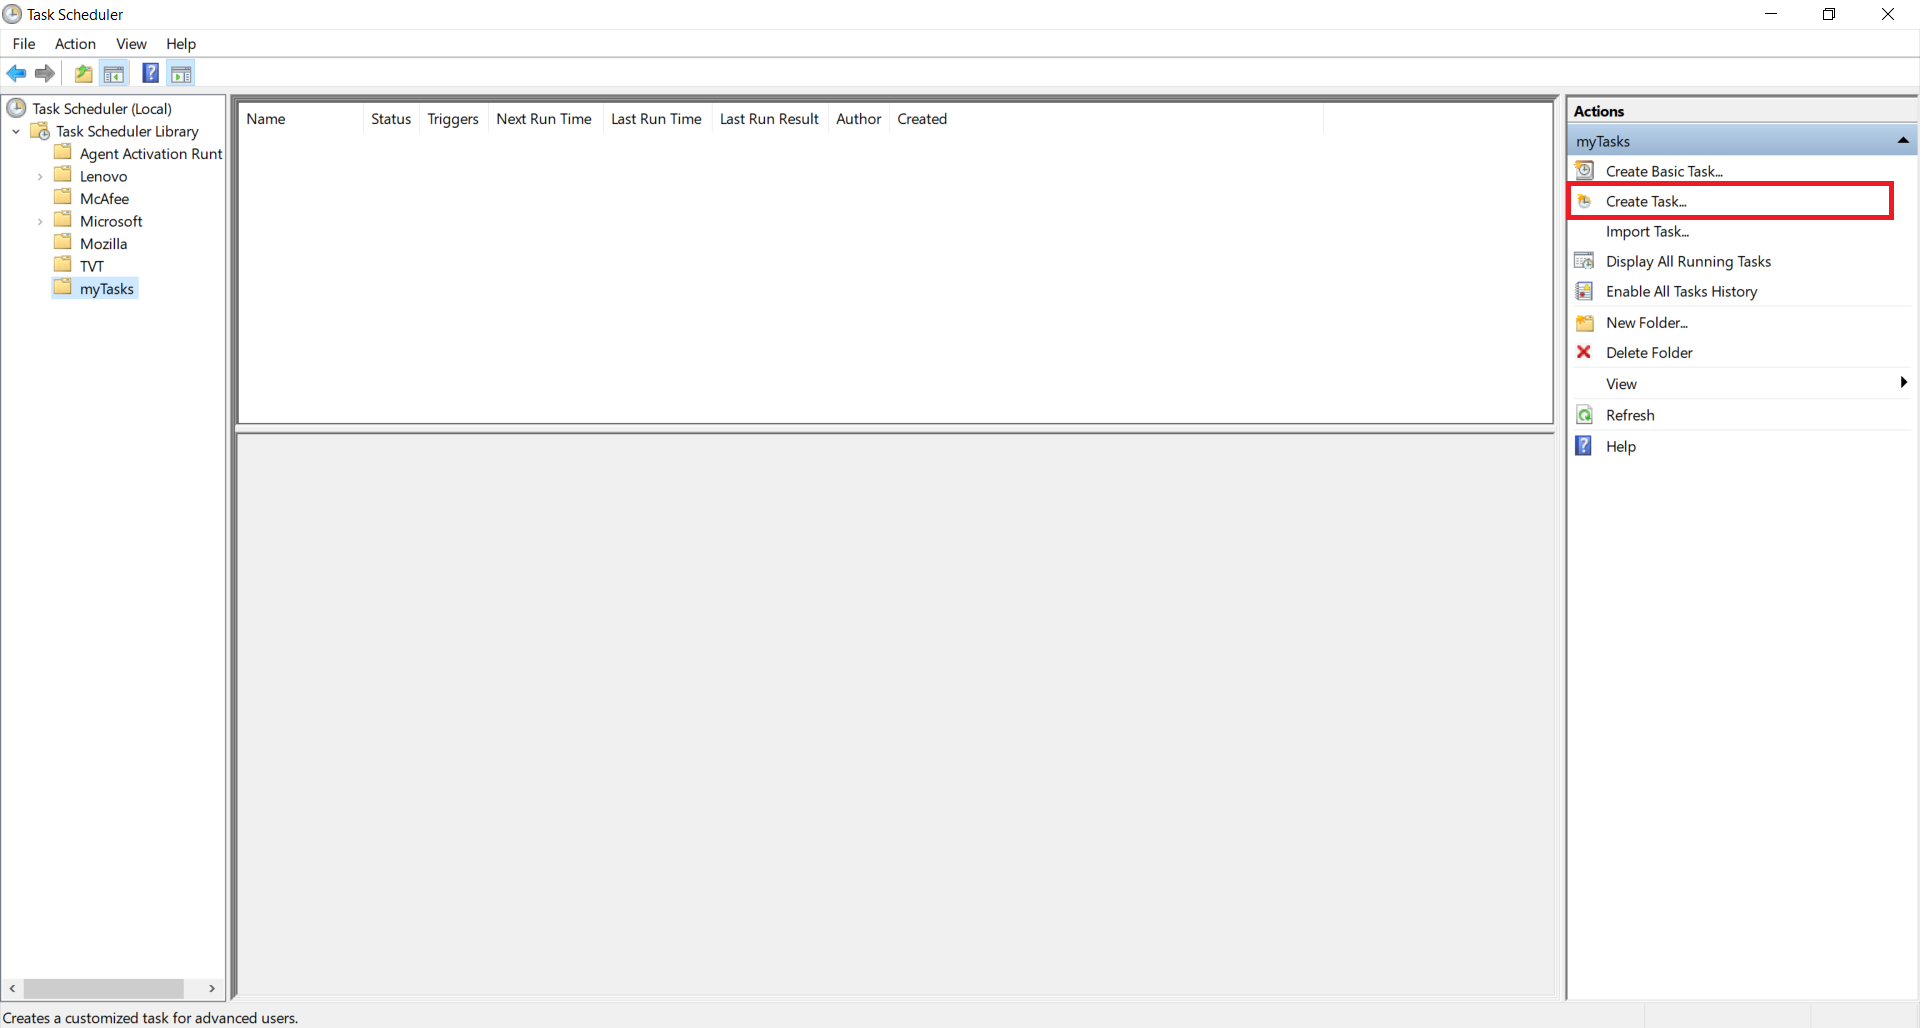
Step 6: In the "Name" field, type a short descriptive name for the task – for example, Open Notepad.
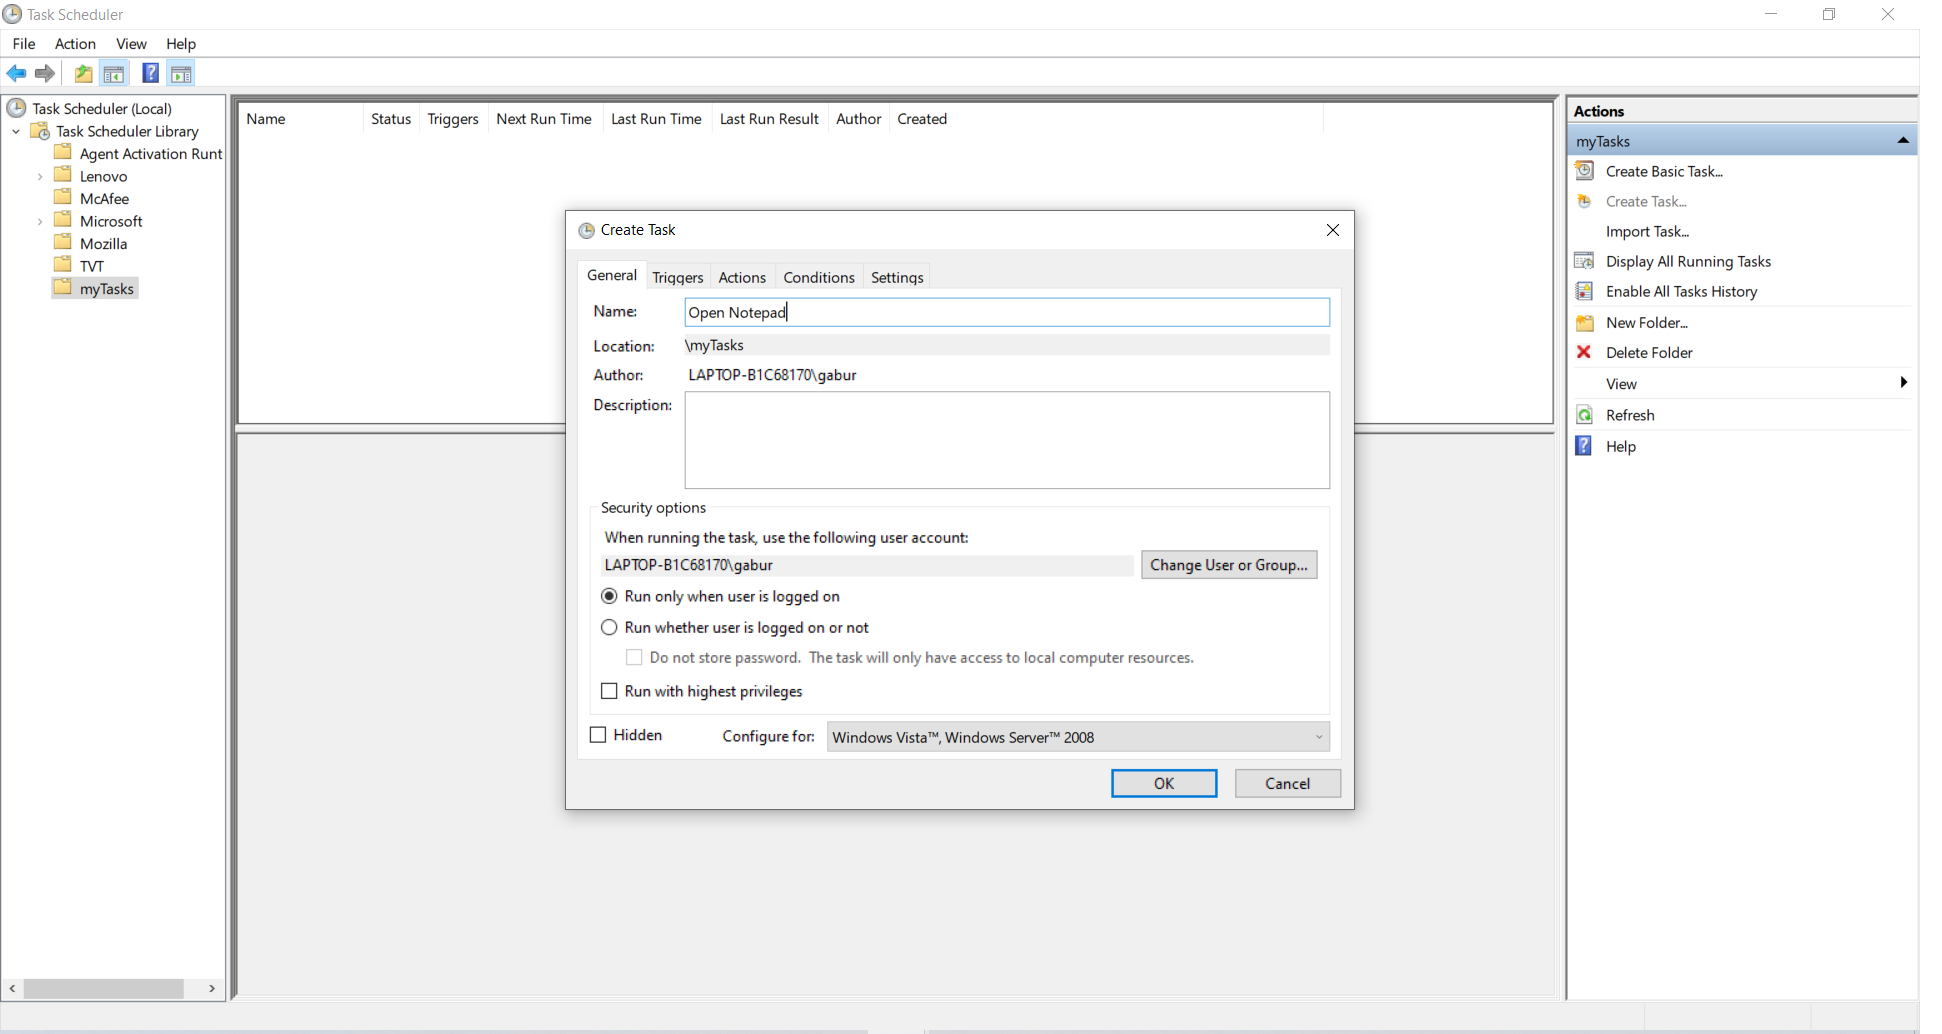
Step 7: (Optional) In the "Description" field, create a description for the task.
Step 8: In the "Security options" section, you can configure which administrator account can run the task.
Quick tip: If you're using an account with administrative privileges, the default user settings should suffice. However, when you're distributing your program using an installer and need to schedule tasks on other user's or client's machines, you'll need to employ a security identifier. This identifier uniquely identifies a security principal or security group. We'll delve into this in just a moment.
Step 9: (Optional) Check the "Run with highest privileges" option if the task requires elevated privileges.
Step 10: The "Configure for" settings should be left alone unless you're required to use a different compatibility option.
Step 11: Click the Triggers tab and Click the New button. A trigger is what initiates the task. You can choose to schedule the task to run daily, weekly, monthly, or when a specific event occurs.
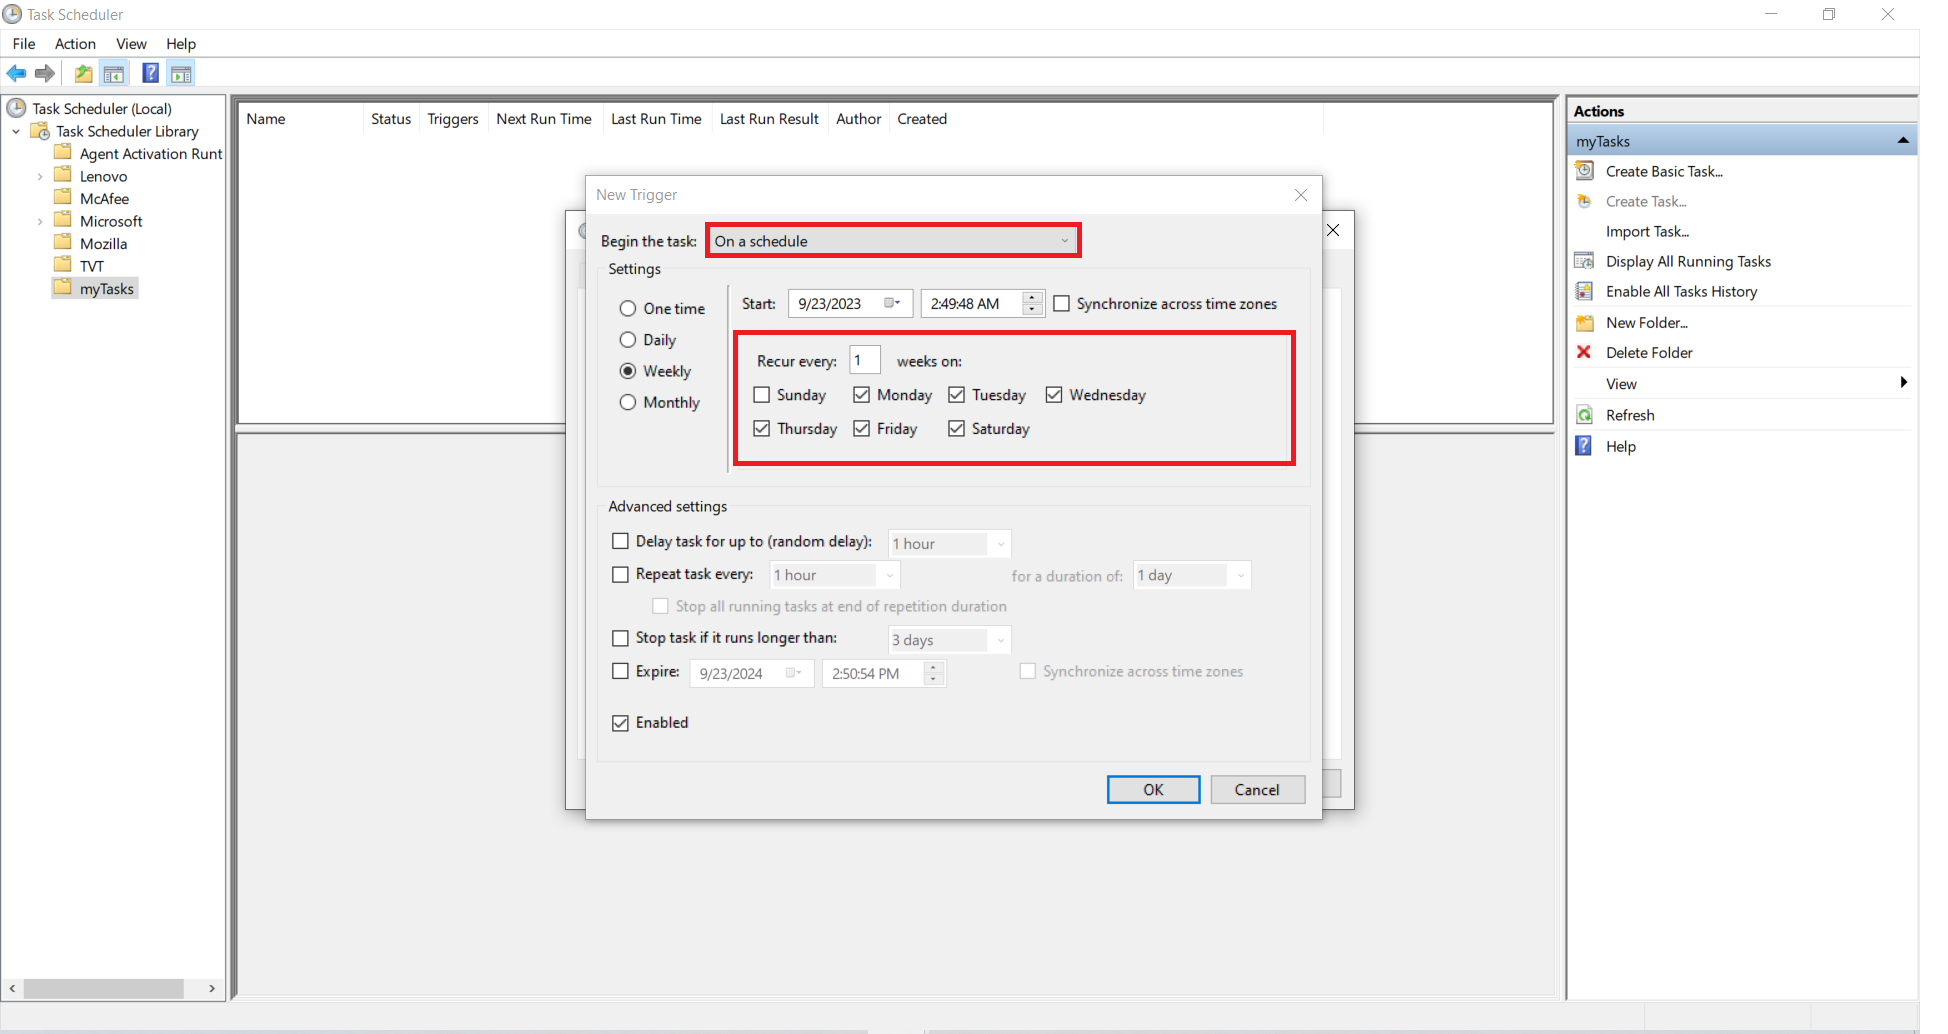
Step 12: Use the "Begin the task" drop-down menu to select one of the many triggers, including "On a schedule," "At startup," "On workstation unlock," and many others. (For this guide, select the On a schedule option.)
Step 13: (Optional) In the "Advanced settings" section, you can select options to delay, repeat, stop, and expire a task. The Enabled option is checked by default. (Usually, you don't want to change these settings unless necessary.)
Step 14: Click the OK button
Step 15: Click the Action tab. Click the New button. The action is what the task will do when it runs. You can choose from various actions like starting a program, sending an email, or displaying a message.
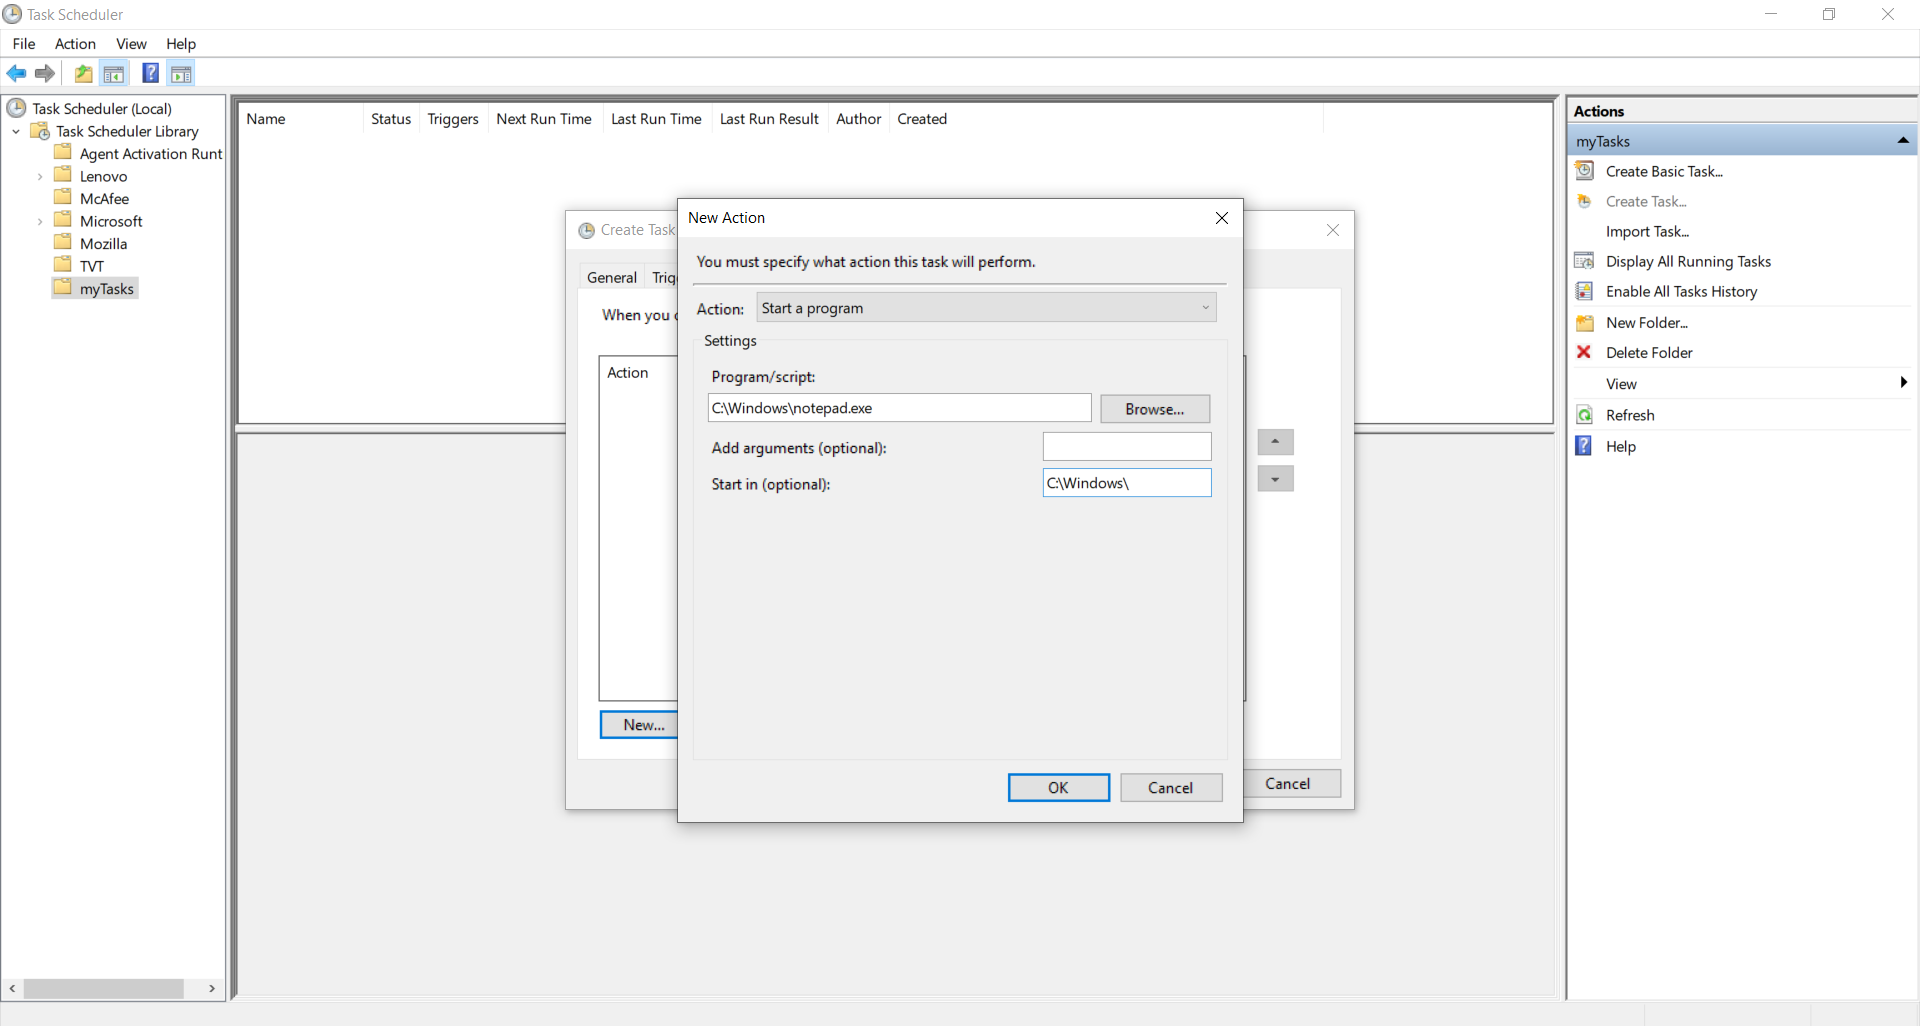
Step 16: Under the "Settings" section, in the "Program/script" field, specify the path for the application – for example, notepad.exe.
Quick tip: If you don't know the path of the app, click the Browse button to find it. Also, if it's a known application like Notepad or Command Prompt, you only need to specify the file name.
Step 17: (Optional) In the "Add arguments" field, you can specify arguments to run the task with special instructions
Step 18: (Optional) In the "Start in" field, specify the folder in which the program will start. (Usually, you can leave this setting empty.)
Step 19: Click the OK button.
Step 20: Click the Conditions tab.
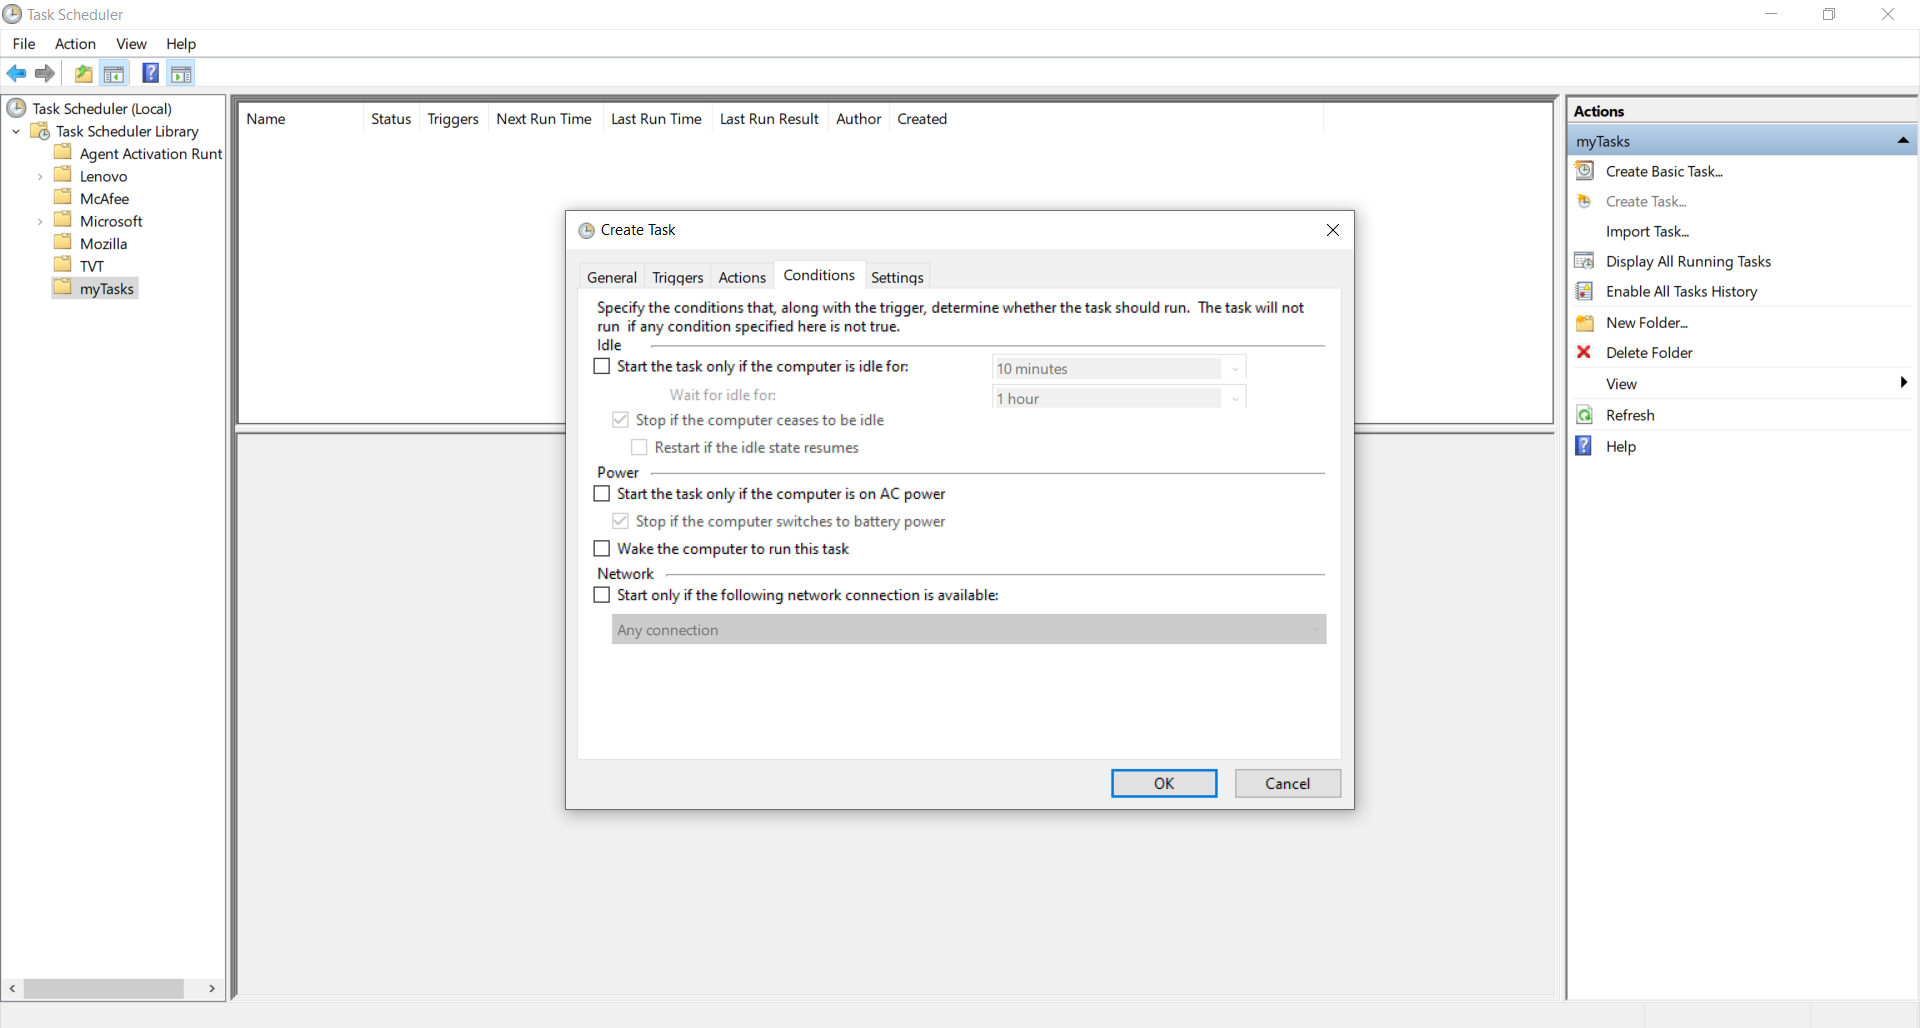
Step 21: (Optional) The "Conditions" tab includes settings that, combined with the "Triggers" settings, will determine when the task should run. (If you're creating a simple task, you don't need to modify these settings).
Step 22: Click the OK button.
Step 23: Click the Settings app.
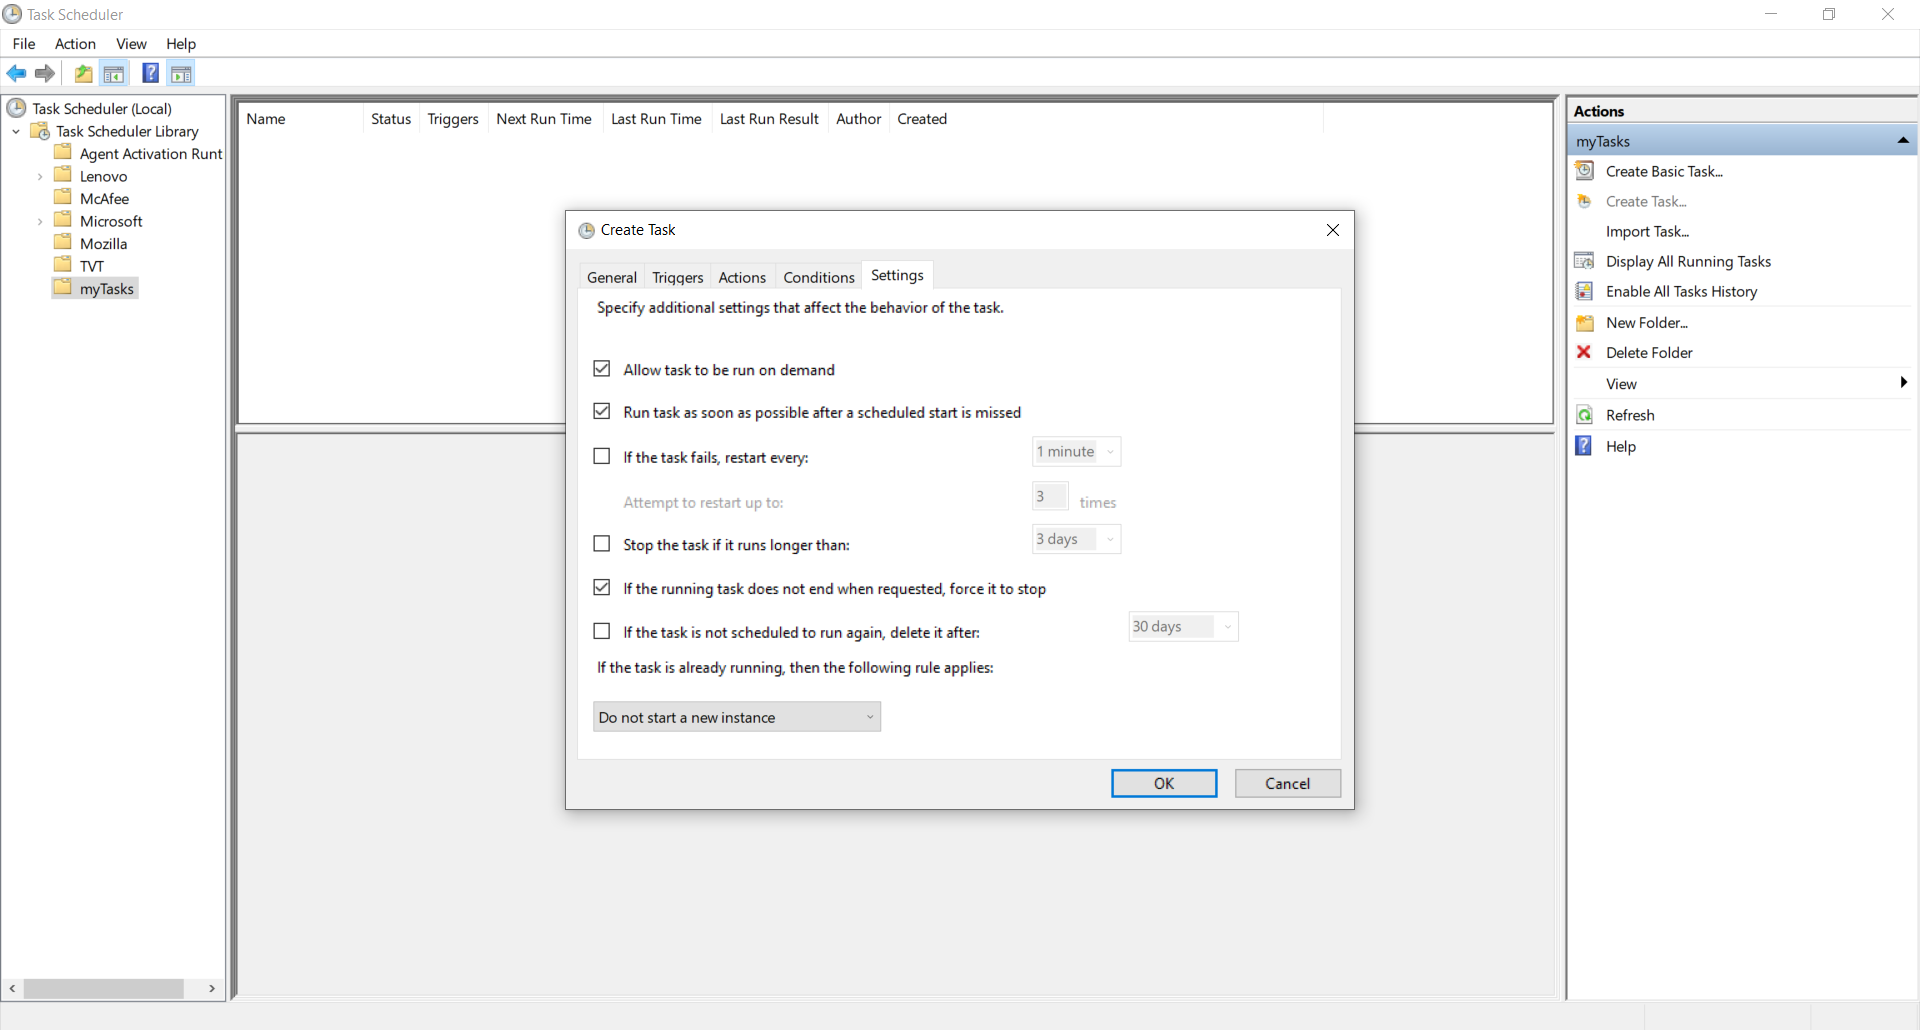
Step 24: (Optional) The "Settings" app includes additional options that will directly affect the behavior of the task. It's not a requirement to change these settings, but it's a good idea to check the options.
Step 25: Click the OK button.
After you complete the steps, the task will run automatically on schedule or event using the specified settings.
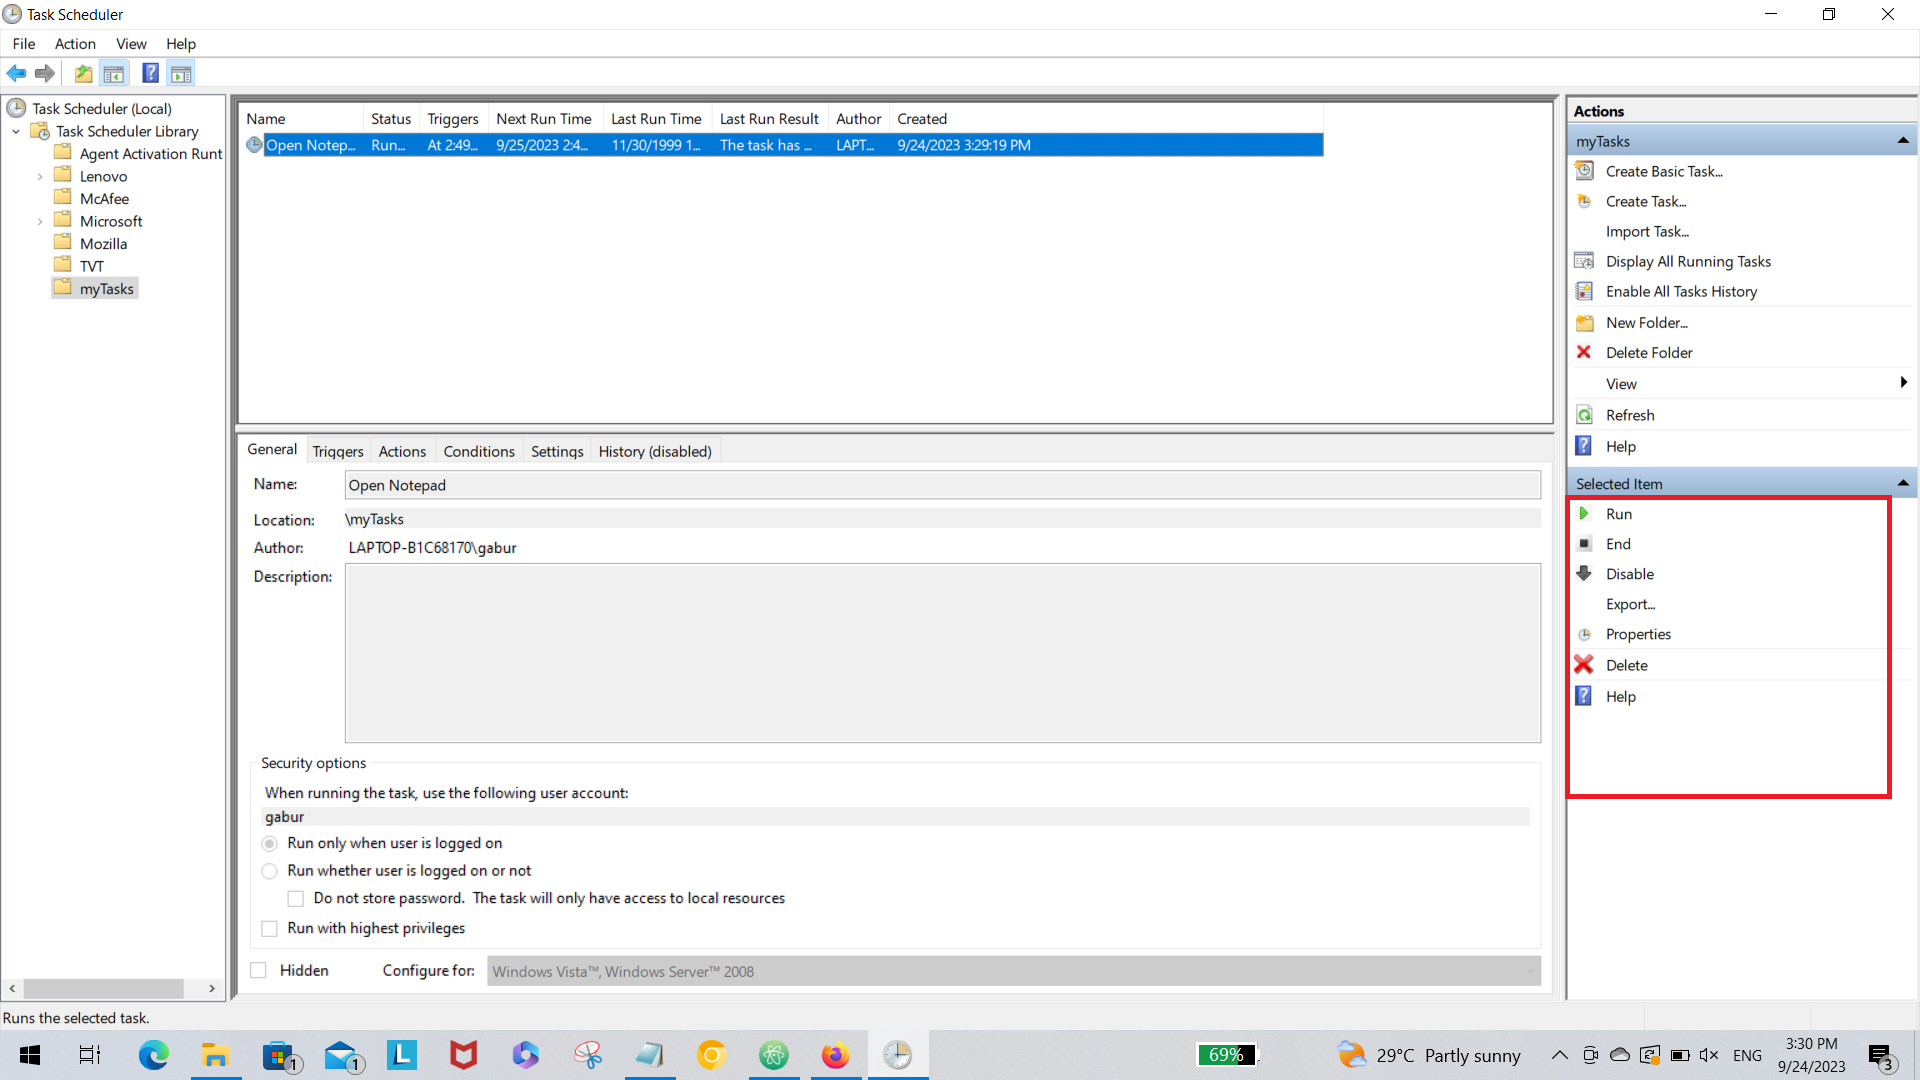
- To run a task on demand, select the Run option.
- To edit a task, select the Properties options.
- To delete a task, select the Delete option.
Create scheduled tasks with Command Prompt
you can also use Command Prompt to create, edit, and delete tasks, which can come in handy in many situations. For instance, when you need to speed up the process to create the same task on multiple computers, and when building an application or script that needs to connect with the tool — just to name a few.
Note: To schedule, view, and change all tasks on the local computer, you must be a member of the Administrators group.
Let's Creat "Open Notepad" Task Using command-Prompt:
>SCHTASKS /CREATE /TN "myTasks/Open Notepad" /TR "C:\Windows\notepad.exe" /SC WEEKLY /D SUN,MON,TUE,WED,THU,FRI /ST 12:24
Delete "Open Notepad" Task Using command-Prompt:
>SCHTASKS /DELETE /TN "myTasks/Open Notepad" /F
- The schtasks.exe tool performs the same operations as Scheduled Tasks
- /tn
<taskname>- Specifies a name for the task. - /tr
<Taskrun>- Specifies the program or command that the task runs.. - /sc
<scheduletype>- Specifies the schedule type..
Let's schedule exported(all configuration are stored in "Open Notepad.xml" file) Task Using command-Prompt:
>SCHTASKS /CREATE /XML "Open Notepad.xml" /TN "myTasks/Open Notepad"
<?xml version="1.0" encoding="UTF-16"?>
<Task version="1.2" xmlns="http://schemas.microsoft.com/windows/2004/02/mit/task">
  <RegistrationInfo>
    <Date>2023-09-24T15:29:19.2779888</Date>
    <Author>LAPTOP-B1C68170\gabur</Author>
    <URI>\myTasks\Open Notepad</URI>
  </RegistrationInfo>
  <Triggers>
    <CalendarTrigger>
      <StartBoundary>2023-09-23T02:49:48</StartBoundary>
      <Enabled>true</Enabled>
      <ScheduleByWeek>
        <DaysOfWeek>
          <Monday />
          <Tuesday />
          <Wednesday />
          <Thursday />
          <Friday />
          <Saturday />
        </DaysOfWeek>
        <WeeksInterval>1</WeeksInterval>
      </ScheduleByWeek>
    </CalendarTrigger>
  </Triggers>
  <Principals>
    <Principal id="Author">
      <UserId>S-1-5-21-your-user-id-digits</UserId>
      <LogonType>InteractiveToken</LogonType>
      <RunLevel>LeastPrivilege</RunLevel>
    </Principal>
  </Principals>
  <Settings>
    <MultipleInstancesPolicy>IgnoreNew</MultipleInstancesPolicy>
    <DisallowStartIfOnBatteries>false</DisallowStartIfOnBatteries>
    <StopIfGoingOnBatteries>true</StopIfGoingOnBatteries>
    <AllowHardTerminate>true</AllowHardTerminate>
    <StartWhenAvailable>true</StartWhenAvailable>
    <RunOnlyIfNetworkAvailable>false</RunOnlyIfNetworkAvailable>
    <IdleSettings>
      <StopOnIdleEnd>true</StopOnIdleEnd>
      <RestartOnIdle>false</RestartOnIdle>
    </IdleSettings>
    <AllowStartOnDemand>true</AllowStartOnDemand>
    <Enabled>true</Enabled>
    <Hidden>false</Hidden>
    <RunOnlyIfIdle>false</RunOnlyIfIdle>
    <WakeToRun>false</WakeToRun>
    <ExecutionTimeLimit>PT0S</ExecutionTimeLimit>
    <Priority>7</Priority>
  </Settings>
  <Actions Context="Author">
    <Exec>
      <Command>C:\Windows\notepad.exe</Command>
      <Arguments>start</Arguments>
      <WorkingDirectory>C:\Windows\</WorkingDirectory>
    </Exec>
  </Actions>
</Task>
Quic Tip: when you're distributing your program using an installer and need to schedule tasks on other user's or client's machines, you'll need to employ a security identifier. for example: S-1-5-4 - A group that includes all users who sign in interactively.
<Principals>
	<Principal id="Author">
	  <GroupId>S-1-5-4</GroupId>
	  <RunLevel>LeastPrivilege</RunLevel>
	</Principal>
 </Principals>
Quic Tip: When scheduling a task on other user's or client's machines, it's important to note that you cannot specify the WorkingDirectory and Arguments directly through the command prompt. Instead, you must utilize the XML option to configure these settings either during runtime or during the installation of your software or program.
<Exec>
  <Command>C:\Windows\notepad.exe</Command>
  <Arguments>start</Arguments>
  <WorkingDirectory>C:\Windows\</WorkingDirectory>
</Exec>
Conclusion
In this article, we've journeyed through the process of crafting automated tasks using Windows Task Scheduler. We've employed the XML approach to create tasks directly from the command prompt.